Thursday, November 24, 2016

Fall Leaves

© Michele Emerson-Robert 2016


Leaves are turning to all the glorious colors of yellow, orange, rust and reds! There are no two alike, and they are all beautiful! Perfect time to get out those scraps of handmade paper that I am always telling you to save, along with some of the half sheets of handmade paper that were left from other projects, and start creating the many fall and Thanksgiving cards that I send out. I send about 50 cards a month – I’d better get busy! Even though I am using “planned overs” (not left overs), I included the full directions for making the paper.


Supplies


Instructions:

1.     Follow the instructions found in any of the Arnold Grummer™ paper making kits to create off-white, tan, olive green and rust slurry, and create one or more sheets of med weight handmade paper. 
2.     Allow the papers to dry.
3.     Tear the sheets of tan or off white paper in half.
4.     Score and fold to create 4 ¼ x 5 ½” top or side fold cards.
5.     Die cut leaves, ferns and words from various scraps or sheets of different colored handmade paper.
6.     Emboss the leaves to bring out the textures.
7.     Apply Chalk inks to the leaves, acorns and ferns with the Stylus™ handle and tips.
8.     Attach the ferns with tiny pieces of foam tape to the side fold card.
9.     Attach the word “Autumn” to the bottom on the fern card.
10.  Layer and attach the leaves and acorns to the top fold card with tiny pieces of foam tape.
11.  Layer and attach with adhesive the word “Fall” onto one of the leaves.

Thursday, November 17, 2016

SUN

© Michele Emerson-Robert 2016


This is my favorite time of year! The days and nights are getting cooler, but the sun is still out in all its glory. When I saw this stamp from Impression Obsession, I knew of several friends who would love the message. Follow along with the instructions below as I created two very different cards


Supplies

·       Any of the Arnold Grummer® paper making kits
·       Blender, strainer, cello sponges and soft towels
·       A sunny window
·       Scraps of white and off white paper (think junk mail, etc.)
·       Dried botanicals
·       Scraps of tan chip board to die cut
·       Scrap of copy paper for mask
·       The PaperCut™ ¼ sheet autumn/gold colored card stock and ½ sheet of rust colored cardstock for one card base
·       Clear envelopes to fit cards
·       Die: Tessler Ellentina™ DCM147 Southwest set
·       SpellbindersTM Grand Calibur™ die cutting and embossing machine
·       Westcott™ paper trimmer
·       Scor-Pal™
·       Beacon ZipDryTM adhesive
·       ColorBox® Chalk ink pad in a darker shade than the autumn gold card stock, Stylus™ handle and white tips
·       Stamp: Impression Obsession TM D17138 “The Sun……..”
·       Tonic Studios™ Nuvo Mousse in a golden or copper tone


Instructions:

1.     Follow the instructions found in any of the Arnold Grummer™ paper making kits to create white slurry and create one or more sheets of medium weight handmade paper with botanical inclusions. 
2.     Allow the paper to dry.
3.     Tear, score and fold half a sheet to create a 4 ¼ x 5 ½” tip fold card.
4.     Stamp the saying “The sun is a daily reminder that we too can rise again from the darkness, that we to can shine our own light.” In the lower left of the folded card.
5.     Die cut two of the sun from a scrap of tan chip board.
6.     Apply the Nuvo Mousse to the sun die cuts. Set one sun aside.
7.     Attach one sun to the top right of the handmade paper card.
8.     Score, cut and fold a 4 ¼ x 5 ½” top fold card from the rust colored cardstock.
9.     Trim the autumn gold card stock a bit smaller than the folded card.
10.  Cut a ¼ rounded shape mask from the scrap copy paper.
11.  Place the mask onto the top left corner of the trimmed piece.
12.  Apply the darker shade of ink with the Stylus™ handle and tip, allowing the color to fadeout toward the right side of the card.
13.  Remove the mask.
14.  Stamp the “The sun……” saying onto the lower right of the card. 
15.  Attach the second sun die cut to the upper left of the card.


Thursday, November 10, 2016

Happy Halloween RIP

© Michele Emerson-Robert 2016


The Halloween holiday is always such fun! I love seeing the kids in costume, and handing out the candy while wearing my “good” witch costume. It bring back memories of my kids when they were little, and one time my son dressed as “Karlif the Mummy,” and lost the wrappings as he went from house to house. Lucky he had long johns on underneath!

Supplies

·       Any of the Arnold Grummer® paper making kits
·       Blender, strainer, cello sponges and soft towels
·       A sunny window
·       Scraps of white and off white paper (think junk mail, etc.)
·       Scraps of black card stock to die cut and for mouse card layer and base
·       Dies: Die-Versions™ Sweet Petites Mouse and Bird, MemoryBoxTM  “Haunted Web” 99007, and CheeryLynnTM “RIP” B637, “Happy Halloween” B469, Spider web corner B117
·       Stamps: Impression ObsessionTM IOD7839 Crows, and Stampscapes™ Moon and clouds
·       Westcott™ paper trimmer
·       Scor-Pal™
·       Beacon ZipDryTM adhesive, double sided foam tape
·       ColorBox® Black pigment ink pad


Instructions:

1.     Follow the instructions found in any of the Arnold Grummer™ paper making kits to create off-white slurry, and create one or more sheets of medium weight handmade paper. Allow the paper to dry.
2.     Tear one sheet of the off-white handmade paper in half, then score and fold to create a 4 ¼ x 5 ½” top fold card.
3.     Die cut the bird, multi webs, and “Happy Halloween” from black cardstock scrap.
4.     Stamp the crows in the bottom left of the handmade paper card.
5.     Attach the multi web die with adhesive to the top of the card.
6.     Attach the “happy Halloween” die cut above the stamped crows.
7.     Attach the bird to the lower right of the card.
8.     Die cut the web corner and “RIP” from black cardstock scrap.
9.     Die cut the mouse from a scrap of off white handmade paper.
10.  Cut three background layers, two of the off white handmade paper and one black.
11.  Score and fold the black cardstock to create a 4 ¼ X 5 ½” side fold card.
12.  Stamp the moonscape onto the smaller piece of handmade paper.
13.  Layer (see photo), center and attach to the front of the card with adhesive.
14.  Attach the web corner to the lower right corner of the layered pieces.
15.  Attach “RIP” to the mouse’s body.
16.  Attach the mouse to the lower left of the layered pieces.

Friday, November 4, 2016

Fall Cards

© Michele Emerson-Robert 2016


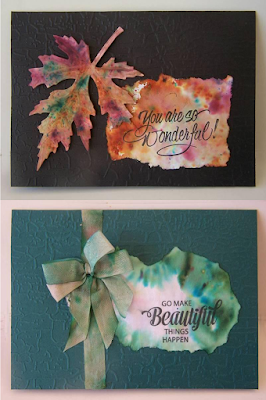
The last day of summer has come and gone, the nights are cool, and fall is officially here. I enjoyed the blue leaf card so much that I had to make one in traditional autumn tones to finish out the cards needed for October birthdays.

Supplies

  • Any of the Arnold Grummer® paper making kits
  • Blender, cello sponges and soft towels
  • A sunny window
  • Scraps of white paper (think junk mail, etc.)
  • Scrap of matboard to die cut the leaf shape
  • The PaperCut™ card bases dark green and black, envelopes
  • Dies: Sizzix™ Tim Holtz  #660039 Layered Leaf and matching embossing folder
  • SpellbindersTM WIZARD™ die cutting and embossing machine (still the best machine to cut and emboss matboard!!!!)
  • Westcott™ paper trimmer
  • Scor-Pal™
  • Beacon ZipDryTM adhesive, double sided foam tape
  • Ken Oliver Color Burst™ paints
  • Fine mister bottle and water
  • ColorBox®  Black pigment ink pad and ColorBox® Stylus and Tips 
  • Stamps: JustRite® sets CR-02143 “Colorful Brush Strokes” & CR-02144 “Bokeh Time”
  • Random pattern 5 x 7” embossing folder
  • Several feet of ½” rayon seam binding ribbon
  • Craft knife and cutting surface

Instructions 

  1. Follow the instructions found in any of the Arnold Grummer™ paper making kits to create white slurry and make one or more sheets of medium weight handmade paper. (I always make extra sheets!) 
  2. Allow the paper to dry.
  3. Tear random pieces approx. 3 x 4”. (Always save the left over pieces for future projects.)
  4. Water down tiny amounts of the Color Burst™ paints, oranges, yellows, greens, browns, blues (you want medium dark colors).
  5. Use the Colorbox Stylus™ handle and tip to apply colors around the edge of each torn sheet of handmade paper and seam binding. Mist the paper and seam binding ribbon if needed. (Refer to photos for colors used.)
  6. Allow the paper and seam binding ribbon to dry.
  7. Stamp “You are so wonderful” onto one piece and “Go make something beautiful happen” on the second piece.
  8. Die cut the leaf from the scrap of matboard.
  9. Apply more intense colors to the matboard leaf die cut
  10. Allow the matboard leaf to dry.
  11. Emboss the matboard leaf with the embossing folder.
  12. Cut, score and fold 5 x 7” cards.
  13. Emboss the random pattern folder on the front of the folded cards.
  14. Cut a small slit at the top left of the green card.
  15. Insert the seam binding ribbon and tie into a bow.
  16. Attach the stamped handmade paper piece to the right side of the card with adhesive.
  17. Attach the leaf die cut to the left side of the black card with tiny pieces of foam tape.
  18. Attach the stamped piece of handmade paper to the right side of the card.