Friday, September 30, 2016

Hands of Faith

© Michele Emerson-Robert 2016


When I was playing several weeks ago with paints, stencils and handmade paper backgrounds, I found the whole process addictive and just keep going and going! Each background “speaks” to me as to how it wants to be completed. Sometimes it is with a stamp and a ribbon, or perhaps it is a die cut and a ribbon. Changing the colors can make a huge difference in the “feel” of a stenciled background (compare the blue and white card to the peach and blue card from Aug. 19th--the same stencil was used. 


Supplies:
·       Any of the Arnold Grummer® paper making kits
·       Blender, cello sponges and soft towels
·       A sunny window
·       Scraps of white paper (think junk mail, etc.)
·       The PaperCut™ White and Royal Blue card stock for card bases
·       Envelopes to fit cards (or create your own using the AG envelope template)
·       Die: Quiet Fire Designs™ EC#1159 “Faith”
·       SpellbindersTM Grand Calibur™ die cutting and embossing machine
·       Westcott™ paper trimmer and scissors
·       Scor-Pal™
·       Beacon ZipDryTM adhesive
·       Stencils: Dreamweaver™ Mosaic Circles, hand cut “filigree” stencil (used a die cut that didn’t cut well……smile)
·       Stamp-A-Mania™ MH7084-H “Each day……..”
·       ColorBox™ Dye based ink pads in black, royal blue, turquoise and hot pink, Stylus™ handle & white tips
·       Ribbon: Winter White seam binding
·       Iron to make the paper smooth


Instructions:

1.     Follow the instructions found in any of the Arnold Grummer™ paper making kits to create white slurry and create one or more sheets of medium weight handmade paper.
2.     Allow the paper to dry.
3.     Iron the paper to make it smooth.
4.     5 x 7” card: Score and fold the royal blue card stock to create a 5 x 7” card.
5.     Cut a white layer piece and a smaller white piece to stencil.
6.     Use the Stylus™ to apply royal blue ink through the Mosaic Circle stencil. Vary the color.
7.     Allow the ink to dry.
8.     Layer the stenciled piece onto the white piece.
9.     Attach the seam binding ribbon to the back side and tie a bow in the middle top of the layered piece.
10.  Attach the layered piece to the center of the card front.
11.  Die cut the word “Faith” from a scrap of heavy weight handmade paper.
12.  Attach the die cut word to the bottom of the layered piece.
13.  4 ¼ x 5 ½ “card: Score and fold the white card stock to create a 4 ¼ x 5 ½” card.
14.  Cut a piece of handmade paper to stencil 3 ½ x 4 3/8”.
15.   Use the Stylus™ to apply the turquoise and hot pink inks through the filigree stencil. Clean the tip between colors.
16.  Allow the ink to dry.
17.  Stamp “Each day…..” with black ink on the right hand side of the stenciled piece
18.  Attach the seam binding to the back of the stenciled piece. Tie a bow at the front.
19.  Center & attach the stenciled piece to the front of the white card.

Friday, September 23, 2016

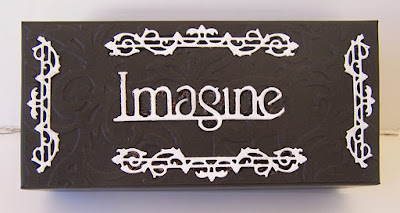
Imagine

© Michele Emerson-Robert 2016


I love to turn a discard into a useful item but also a piece of art. A friend gave me a number of these boxes and they will be perfect to repurpose and to give as gifts this year. This one will go to a sweet friend and can be used as a “catch all” (you know those tiny odds and ends) in her beautiful black and white bathroom.  I used scraps of heavy weight white handmade paper to die cut the images and word, but in case you need to start from scratch, follow the instructions below.


Supplies

·       Any of the Arnold Grummer® paper making kits
·       Blender, cello sponges and soft towels
·       A sunny window
·       Scraps of white paper (think junk mail, etc.)
·       Dies: Tonic Studios™ #1120E Filigree Flourish, # 26E “Live the life……..”
·       Tonic Studios™ Tangerine die cutting and embossing machine
·       Iron to make the handmade paper smooth
·       Beacon ZipDryTM adhesive
·       Pre made box 6 ½ X 3 x 2” (or make your own)


Instructions:

1.     Follow the instructions found in any of the Arnold Grummer™ paper making kits to create white slurry and create one or more sheets of heavy weight handmade paper.  
2.     Allow the paper to dry.
3.     Iron the paper to make it smooth.
4.     Die cut the word just the word “Imagine”.
5.     Die cut 4 of the flourish.
6.     Trim the ends off of two on the flourish die cuts.
7.     Attach the flourish die cuts along the edges of the top of the box lid.
8.     Trim the word “Imagine” from the rest of the die cut.
9.     Attach the word to the center of the box lid.


NOTES: It would be fun to create a matching gift card or tag.
These boxes could be decorated for any occasion or theme.
You could fill the boxes with mints or small personal items.
Always save the scraps!
Oh dear, I better get busy……smile

Friday, September 16, 2016

Beautiful Backgrounds

© Michele Emerson-Robert 2016


Some handmade paper, a few ink pads and re-inkers, stamps and stencils and what have you got? Literally hundreds of backgrounds for cards, collage and mixed media pieces! Beware! Creating these backgrounds is addictive!


Supplies

·       Any of the Arnold Grummer® paper making kits
·       Blender, cello sponges and soft towels
·       A sunny window
·       Scraps of white paper (think junk mail, etc.)  
·       The PaperCut™ various colors of cardstock for card bases and envelopes
·       Stencils: Dreamweaver™ LJ901, Arabesques handmade stencil
·       Tonic Studios™ paper trimmer and scissors
·       Scor-Pal™
·       Tonic Studios™ Craft Tacky glue
·       ColorBox™ dye based ink pads in tans & rusts, blues, greens, peach, black, Stylus™ handle and white tips
·       Winter White seam binding
·       Stamps: Stamp-A-Mania™ MH7125-H “Love….”, “Heart Of a Friend” (sorry I have lost the #)
·       Iron

Instructions:

1.     Follow the instructions found in any of the Arnold Grummer™ paper making kits to create white slurry and create several sheets of medium weight handmade paper. 
2.     Allow the paper to dry.
3.     Iron the paper to make it smooth.
4.     Cut a layer piece for each card 3¾ x 5”.
5.     Cut a background piece for each card 3½ x 4 7/8”. (Remember to always save the scraps!)
6.     Use the Stylus™ handle and tips to lightly apply the inks onto the background pieces through the stencils varying the colors.
7.     When the stenciled ink is dry, stamp “Love is the river of Life in the world” to the blue/peach background with black ink and “And the song, from beginning to end, I found in the heart of a friend” on the rusty back ground with dark rust ink.
8.     Attach the seam binding to the back top parts of the cards, tie a bow.
9.     Layer and attach the background piece to the white layer.
10.  Score and fold the card bases from various colors of card stock (match one of the colors of ink).
11.  Attach the layers to the card fronts.
12.  Add your message inside the card.

Friday, September 9, 2016

Fairy Tag Books

© Michele Emerson-Robert 2016


Tales of fairies and wee folk are part of my Irish heritage. As a little girl I used to love to hear about their world and lives. These two little books full of fairy quotes will be for my two youngest great nieces to carry on the tradition.


Supplies

·       Any of the Arnold Grummer® paper making kits
·       AG 52 card fan book 2 ½ x 5 ½” for each fairy tag
·       Blender, cello sponges and soft towels
·       A sunny window
·       Scraps of white paper (think junk mail, etc.)
·       Die: Tonic Studios™ #1002E Rocco Fairy Rhoslyn, #1101E Rocco Fairy Lilly
·       Tonic Studios™ Tangerine die cutting and embossing machine
·       Double sided foam tape
·       Tonic Studios™ Craft Tacky Glue
·       ColorBox™ Dye ink pads & re-inkers in light blue, grey & peach, Stylus™ handle and white tips
·       Fibers and ribbons in grey and peach
·       1/4” round hole punch
·       Stamps: Impression ObsessionC13069 Change, D8548 How beautiful…….
·       Iron, bottle with a fine mist


Instructions:

1.     Follow the instructions found in any of the Arnold Grummer™ paper making kits to create white slurry and create one or more sheets of heavy weight handmade paper. Allow the allow paper to dry.
2.     Iron the paper to make it smooth.
3.     Cut two tag shapes a bit longer than the front of the fan books.
4.     Punch a hole at the top of each tag.
5.     Die cut the two fairies
6.     Use the Stylus™ handle and tip to lightly apply the peach and light blue inks to one of the tags and grey and light blue ink to the second tag. Mist with water if needed.
7.     Lightly apply light blue ink to the edges of Rhoslyn and gray to the edges of Lily.
8.     Allow the fairy die cuts and tags to dry.
9.     Stamp “How beautiful a day can be when love touches it” to the top of the peach/light blue (Rhoslyn) tag with blue ink.
10.  Stamp “Change always comes bearing gifts” to the top of the gray (Lily) tag with gray ink.
11.  Attach the fibers through the hole at the top of the tags.
12.  Attach the fairies to the front of the tags with tiny pieces of foam tape.
13.  Fill the books with stamped “fairy” sayings and quotes.
14.  Cut and attach pieces of handmade paper to fit the back cover of the fan book with glue.
15.  Attach the tags to the fronts of the fan books with glue


Friday, September 2, 2016

Fairy Hideaway

© Michele Emerson-Robert 2016


One of the neighbor’s little girls is having a 7th birthday party next weekend and she loves anything to do with Fairies! Do you remember how much fun coloring was? The new Double Details die set and stencil “Poppy Hideaway” are perfect for her birthday card!

Supplies

·       Any Arnold Arnold Grummer® paper making kits
·       blender, cello sponges, towels
·       Scraps of white paper (think junk mail)
·       5 x 5” scrap of white paper for card liner
·       Iron (to make the handmade paper smooth)
·       Die: Tonic Studios™ 1141E Double Details Poppy Hideaway
·       Stencil: Tonic Studios™ 1145E Double Details Poppy Hideaway
·       Tonic Studios™ Tangerine die cutting and embossing machine
·       Tonic Studios™ paper trimmer
·       Tonic Studios™ Nuvo Pen Collection: 318N Skin tones, 316N Rosy Pinks, 313N Woodland Greens, 315N Royal Purples, 212N Sunshine Yellows, 320N Depth & Shadows
·       Tonic Studios™ Craft Tacky glue
·       Scor-Pal™


Instructions:

1.     Follow the instruction found in the Arnold Grummer paper making kit or books to create white slurry.
2.     Create one or more sheets of heavy weight handmade paper. Allow the paper to dry.
3.     Cut and score the white heavy weight handmade paper to create a 5 x 5” top fold card.
4.     Center, cut and emboss the inside die on the folded card front.
5.     Place the stencil onto the die cut and embossed card.
6.     Use the lightest shade of green to color in the stems and leaves. Shade with the medium green, blend with the blending pen.
7.     Use the lightest shade of pink to color the flowers. Shade with the medium shade of pink, blend with the blending pen.
8.     Use the lightest shade of purple to color in her dress. Shade with the medium shade of purple. Blend with the blending pen.
9.     Color in her hair and wings with the lightest shade of yellow. Shade with the medium yellow. Blend with the blending pen.
10.  Color her face, arm and hand with the lightest flesh color. Shade with the medium flesh color. Blend with the blending pen.
11.  Apply the blending ink in small areas around the edge of the card, adding light pink and light purple while it is still wet.
12.  Attach the liner with glue.