Friday, December 25, 2015

Gratitude

©Michele Emerson-Roberts 2015


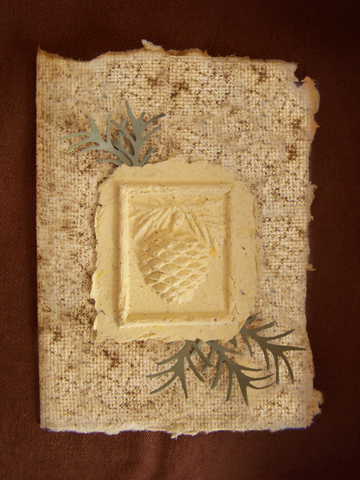
I practice four “Rs”: Recycle, Restyle, Revamp and Repurpose every chance I can. Making handmade paper the Arnold Grummer way is one of the best ways to do it. Most people throw away a ton of paper every year - not this gal! Look what can be created in a few minutes!

As always, with “gratitude” to Arnold and his family.


Supplies:

  • Any of the Arnold Grummer™ paper making kits
  • A sunny window
  • Blender, strainer, cello sponges and soft towels
  • Scraps of off white, tan & brown paper (think junk mail, etc.)
  • Beacon ZipDryTM Adhesive, double sided foam tape or dots
  • Envelopes to fit cards (or make your own with the AG envelope template)
  • Scor-palTM
  • Scraps of ivory, light & dark olive green handmade paper, junk mail or cardstock
  • 4 x 5” scrap of tissue paper
  • Dies: CheeryLynnTM # B118 Pair of Ferns
  • SpellbindersTM Grand Calibur die cutting machine
  • Stamp: Impression ObsessionTM 14440E
  • ColorBoxTM Chalk Charcoal Ink pad
Instructions:

  1. Follow the instructions found in any of the Arnold Grummer™ paper making kits to create one or more sheets of heavy weight cream colored speckled paper. (Create more sheets if you are going to make numerous cards; one sheet will make 2 cards.)  
  2. When the paper is dry, fold and tear it (you want the deckle edges) to make two pieces 5 ½ x 8 ½”.
  3. Score and fold to create a 4 ¼ x 5 ½” cards.
  4. Die cut one each of the ferns from the ivory, light & dark olive scrap. I used the set that curved right for the card and saved the other set for another project.
  5. Stamp the “gratitude” sentiment on the piece of tissue paper with the Chalk ink.
  6. When the ink is dry attach the stamped tissue paper to the lower right front of the card.
  7. Add tiny pieces of foam tape to the back of the ferns, layer light over dark and attach to the top of the card.
Note: The stamp quote is from Melody Beattie and is one of my favorites. It reads: Gratitude unlocks the fullness of life. It turns what we have into enough and more. It turns denial into acceptance, chaos to order, confusion into clarity. It can turn a meal into a feast, a house into a home, a stranger into a friend.


Friday, December 18, 2015

“Hope, Trust, Love”


©Michele Emerson-Roberts 2015


When I saw this Impression Obsession™ stamp and the new dies from the Paper Cut™, I knew they would make the perfect card for a friend who is going through a rough patch in her life.

This card was made from one of the “extra sheets” of handmade paper I always make to keep on hand, but I included the ‘from scratch’ instructions in this project.

Supplies:

  • Any of the Arnold Grummer™ paper making kits
  • A sunny window
  • Blender, strainer, cello sponges and soft towels
  • Scraps of off-white, tan & brown paper (think junk mail, etc.)
  • Graphic45TM “Topography” scrap for card front liner
  • Scraps of black cardstock or heavy weight hand made paper
  • Envelopes to fit cards (or make your own with the AG envelope template)
  • Beacon QuickGripTM Adhesive, double sided foam tape or dots
  • Scor-palTM (Love the new 1/8version)
  • Dies: The Paper Cut™ PCDIE001Tripple Fancy Tag Card making die & PCDIE002 Fancy Tag Layering die set
  • Stamps: Impression ObsessionTM # D1446 “Good things” & JustRite™ small word stamps
  • ColorBoxTM Charcoal ink pad
  • 1/8” round hole punch
  • Approx. 9” Black Rattail cord
  • Scissors, Iron 

Instructions:

  1. Follow the instructions found in any of the Arnold Grummer™ paper making kits to create a sheet of heavy weight cream handmade paper (think cardstock weight). Note - create more sheets if you are going to make numerous cards….. one sheet will make one card.
  2. Iron the paper to make it smooth.
  3. Follow the die package instructions to create the Z fold card.
  4. Fold the extra right side piece under to form the “Z”.
  5. Attach the piece of G45 cardstock inside this fold.
  6. Stamp the sentiment and 3 words onto scrap of handmade paper.
  7. Die cut the layering background pieces with the largest die from black card stock scrap.
  8. Die cut the 3 words.
  9. Layer the sentiment piece onto black card stock.
  10. Punch two holes at the top and tie a knot through the holes with the Rattail cord.
  11. Attach the layered piece to the left side of the card.
  12. Layer the 3 words onto the black backing pieces and attach them to the fancy tag part of the card.
  13. Hand write a note of encouragement inside the card and send it on its way.

Friday, December 11, 2015

"Grateful"

©Michele Emerson-Roberts 2015


This is the time of year that we so often reflect back on all we have to be grateful for - our country, our families, our friends and neighbors, our four legged friends, our health, our lives  and so much more! I think it would be a better world if we would do this every day. I have so much to be grateful for; I am indeed blessed.

The card looks hard but come together in a short amount of time (I created 12 cards in a couple of hours.)


Supplies:

  • Any of the Arnold Grummer™ paper making kits
  • A sunny window
  • Blender, strainer, cello sponges and soft towels
  • Scraps of off white, tan & brown paper (think junk mail, etc.)
  • Beacon QuickGrip™ Adhesive, double sided foam tape or dots
  • Envelopes to fit cards (or make your own with the AG envelope template)
  • Scor-palTM (Love the new 1/8version)
  • Sharpie® markers (2 shades each, red, green, yellow, purple, orange, brown)
  • Scraps of tan chip board (I used the backside of cereal boxes)
  • Dies: CheeryLynnTM
  •  # B615 (Grateful), # B600  (Thankful Harvest)
  • SpellbindersTM Grand Calibur die cutting machine
Instructions:

  1. Follow the instructions found in any of the Arnold Grummer™ paper making kits to create one or more sheets of heavy weight tan speckled paper. (Create more sheets if you are going to make numerous cards; one sheet will make 2 cards.)  
  2. When the paper is dry, fold and tear it to make two pieces 5 ½ x 8 ½”.
  3. Score and fold to create a 4 ¼ x 5 ½” cards.
  4. Die cut one cornucopia and word for each card from the tan chip board.
  5. Color the word with light green, while it is still wet, color it with dark green.
  6. Color one item at a time (Ex: grapes). Color with the light colored marker first, while it is still wet shade with the darker color, color again with the lighter marker to blend. Repeat these steps on each item. Refer to the sample for color and shading placement. The coloring does take a few minutes but is beautiful when finished.
  7. Attach the word to the top right of the card with the QuickGrip™ adhesive.
  8. Add foam tape to the back of the cornucopia basket rim and then attach it to the bottom left corner of the handmade paper card with QuickGrip™.

          NOTE: I always make extra sheets of paper to have on hand for future projects.


Friday, December 4, 2015

Elk casting

©Michele Emerson-Roberts 2015


I love this time of year. Things start to slow down and become more peaceful with the cooler weather and the shorting of days. It is never too early to start on the Christmas and other gifts that are needed. This project will be a birthday gift for my favorite brother-in-law.


    Supplies:
    • Any of the Arnold Grummer™ paper making kits
    • A sunny window
    • Blender, strainer, cello sponges and soft towels
    • Scraps of beige, tan, ivory paper (think junk mail, etc.)
    • Elk mold (I used the back side of an antique pewter plate)
    • Beacon ZipDryTM Adhesive
    • Matboard with round whole cute into it, and frame with glass (deep enough frame to allow for spacers)

    Instructions:

    1.    Follow the directions found in any of the Arnold Grummer™ paper making kits to create light tan slurry. 
    2.    Follow the instructions for paper casting.
    3.    When you have removed all of the water from the mold, allow the casting to dry.
    4.    When the casting is dry, mount it onto the mounting matboard with ZipDry™ adhesive.
    5.    Make sure the glass is clean, place it into the frame.
    6.    Attach the spacers to the glass/frame.
    7.    Place the matboard, the mounting board with the casting attached, and a back board into the frame.

Friday, November 27, 2015

For My Guys

©Michele Emerson-Roberts  2015


Creating cards for the guys in my life can be a challenge!  Never fear - .a few pieces of handmade paper to the rescue!

I wanted to play with some new ideas and this was the perfect place and time. If I make at least two of each card I will have one for each of the four guys birthdays…..smile. Better make some extras just in case!


Supplies:

  • Any of the Arnold Grummer™ paper making kits
  • A sunny window
  • Blender, small strainer, cello sponges and soft towels
  • Scraps of ivory or white paper (think junk mail, etc.)
  • Dies:  Impression Obsession #310-XX Forest & 080-N Deer Trio
  • SpellbindersTM  Grand Calibur™ Machine
  • Tan and white card stock for card bases (small card is 4 ¼ x5 ½”, large card is 5 x 7” folded)
  • Envelopes to fit cards
  • Black scraps and tan scraps for die cutting
  • WestcottTM paper trimmer & scissors
  • Scor-palTM (LOVE the new 1/8th version!)
  • BeaconTM ZipDry™ adhesive, double sided foam tape or dots
  • DecoArtTM Acrylic paints: golden yellow, olive and grass green, brown
  • Sea sponge
  • Autumn word stamp
  • Clearsnap™ Olive Chalk™ ink pad
  • Iron if you want the paper smooth

Instructions:

  1. Follow the direction for paper making and casting found in any of the Arnold Grummer paper making kits or books to make slurry from the white/ivory scraps.
  2. Create one or more sheets of medium weight white/ivory handmade paper.
  3. When the sheets of paper are dry, cut them in half.
    - For the large card: trim to 4 ½ x 6 ½”.
    - For the small card trim a ¼ sheet to 4 1/8 x 5 ¼”.
    (Save the extra pieces for other projects)
  4. Water down the acrylic paints.
  5. Use the sea sponge to dab and swirl the paints onto the handmade paper pieces. (See samples for color combos.)
  6. Allow paint to dry.
  7. Die cut the 3 deer, and one set of trees from black cardstock.
  8. Die cute a set of trees from tan scrap.
  9. Stamp the word “Autumn” with the olive Chalk ink onto a scrap of the painted paper.
  10. Cut a piece of the tan scrap a little bit larger than the stamp piece.
  11. Score and fold the cards.

Assemble the cards:

Large card:

1.      Attach the painted paper to the card front with ZipDry™ adhesive.
2.      Attach the die cut trees and deer trio to the painted paper with tiny pieces of foam tape.

Small card:

1.      Attach the painted paper to the card front with ZipDry™ adhesive.
2.      Attach the die cut trees to the painted paper with tiny pieces of foam tape.
3.      Layer the stamped word onto a tan scrap and attach to the bottom of the card.

Friday, November 20, 2015

Spooky City!!!!

©Michele Emerson-Roberts  2015


I LOVE Halloween! Creating and sending out over 50 Halloween cards every year is such fun to do. This year’s cards are really different; no pumpkins, skeletons or black cats for me, but the card still conveys the spirit of Halloween. Wonder what the ghosts and goblins who live in the imaginary city are doing to celebrate?


Supplies:

·        Any of the Arnold Grummer™ paper making kits
·        A sunny window
·        Blender, small strainer, cello sponges and soft towels
·        Scraps of ivory or white paper (think junk mail, etc.)
·        Dies: Impression ObsessionTM #339-Z Cityscape
·        SpellbindersTM Grand Calibur™ Machine
·        Black card stock for card bases (card is 4 ¼ x5 ½” folded)
·        Envelopes to fit cards
·        Black white core cardstock scraps for die cutting
·        WestcottTM paper trimmer & scissors
·        Scor-palTM (LOVE the new 1/8th version!)
·        Beacon ZipDry™ adhesive, double sided foam tape or dots
·        DecoArtTM Acrylic paints: golden yellow, black and reddish brown
·        Med. sized foam alphabet stamps
·        Sea sponge
·        Iridescent glitter
·        White sticker circle
·        Iron if you want the paper smooth
·        Sanding block

Instructions:

1.      Follow the direction for paper making and casting found in any of the Arnold Grummer paper making kits or books to make slurry from the white/ivory scraps.
2.      Create one or more sheets of medium weight white/ivory handmade paper.
3.      When the sheets of paper are dry, cut them into quarter sheets.
4.      Trim a ¼ sheet to 4-1/8” x 5 1/4". (Save the extra pieces for other projects.)
5.      Water down the acrylic paints, and use the sea sponge to dab and swirl the paints onto the handmade paper pieces.
6.      Allow paint to dry.
7.      Randomly stamp some of the alphabet letters with the black paint onto the painted papers.
8.       Allow paint to dry.
9.      Die cut the two cityscape buildings from black cardstock.         
10.   Trim the die cuts to fit the card. Save the "trims"....they will be used for the back (3rd) row.
11.   Sand the buildings that you want in the front row.
12.   Sand just the top of the buildings in the second row. Do not sand the building in the third row.
13.   Attach the moon to the upper right of the painted paper.
14.   Apply a thin coat of ZipDry™ to the moon.
15.    Sprinkle on a tiny bit of glitter.
16.   Score and fold the cards.

Assemble the cards:

1.      Attach the painted paper to the card front with ZipDry™ adhesive.
2.      Layer and attach the die cut buildings to the painted paper with tiny pieces of foam tape.


Friday, November 13, 2015

Embedded Desert Landscape

©Michele Emerson-Roberts 2015


What fun! Think of all the themes/subjects that are at your finger tips! One more way of re-purposing items that would go into the trash and make beautiful art too!  What a wonderful gift this would make!


Supplies:

  • Any of the Arnold Grummer™ paper making kits
  • A sunny window
  • Blender, cello sponges and soft towels
  • Scraps of beige, tan, ivory paper (think junk mail, etc.)
  • Magazine page of your choice with torn edges
  • Beacon ZipDry™ Adhesive
  • Matt board
  • Optional: glass and frame with room for spacers – or perhaps a tabletop easel
Instructions:

  1. Follow the directions found in any of the Arnold Grummer™ paper making kits to create light tan slurry. 
  2. Create a sheet of heavy weight paper.
  3. Remove most of the water from the paper.
  4. While the sheet of paper is still damp, lay the magazine page onto the damp paper.
  5. Remove the rest of the water from the paper. The page is now embedded into the sheet of handmade paper.
  6. When the sheet of handmade paper is dry, tear the edges and mount it onto the matt board with ZipDry™ adhesive leaving a border.
  7. If you’re framing yours, make sure the glass is clean before placing it into the frame. Then attach spacers to the glass/frame, then place the art work into the frame.

Friday, November 6, 2015

It’s Fall Y’all

©Michele Emerson-Roberts 2015


I love this time of year. The leaves are turning a multitude of colors as it’s beginning to cool off a bit here in Southeastern Arizona. This is a great time to start thinking about Thanksgiving and/or Christmas cards. Today’s card would be wonderful for either holiday… just change the colors for Christmas.

I have a lot of Thanksgiving cards to send out so I had better get busy…….smile

Supplies:

  • Any of the Arnold Grummer™ paper making kits
  • Microwave , heat tool or a sunny window
  • GM H 6031 Pine Cone casting mold
  • Blender, strainer, cello sponges and soft towels
  • Scraps of off white and tan paper (think junk mail, etc.)
  • Spice in a brown color (great way to use up those outdated spices and it smells good too!)
  • Beacon QuickGrip™ Adhesive
  • Scraps of olive green handmade paper
  • Envelopes to fit cards (or make your own with the AG envelope template)
  • Scor-palTM (love the new 1/8version!)
  • SpellbindersTM  Grand Calibur
  • Die: CheeryLynnTM  B146 Pine Branches

Instructions:

  1. Follow the instructions found in any of the Arnold Grummer™ paper making kits to create a pinecone castings. (I always make extra! And did you know that you can save the slurry? Place it in a strainer and let it dry. Pop the dried slurry out of the strainer and store for future use.)
  2. Dry the casting.
  3. Make more slurry and create a sheet of heavy weight handmade paper (create more sheets if you are going to make numerous cards….. one sheet will make 2 cards.)
  4. Sprinkle the spice onto the damp paper.
  5. When the paper is dry, fold and tear it to make two pieces 5 ½ x 8 ½”.
  6. Score and fold to create two 4 ¼ x 5 ½” cards.
  7. Die cut the pine greenery from the olive green scraps.
  8. Attach 3 pine pieces to the lower right and 2 pine pieces to the upper left of the casting.
  9. Attach the casting to the front center of the card with the QuickGrip™ adhesive.

Friday, October 30, 2015

Paper Cast Journals

©Michele Emerson-Roberts 2015


I love journals! Any shape, any size, any kind! I love creating them, using them and especially giving them as gifts. Two dear friends have birthdays this month and I wanted to create something extra special for them but was really short on time. I had two blank journals that I purchased several months back and knew with a few minutes of “creative time” they would be perfect for the birthday gifts.

Note: I had previously made the castings so the project took less than 15 minutes each to complete.


Supplies:

  • Any of the Arnold Grummer paper making kits
  • Blender, strainer, cello sponges and soft paper towels
  • Sunny window, microwave or heat gun
  • Scraps of white and Ivory/cream/tan paper (think junk mail etc.)
  • Hands mold (I used a matrix board as a mold)
  • ColorBoxTM  Stylus™ handle and tips
  • Water based inkpads in black/gray and rusty red
  • One each 4 ¾ x 6 ¾” black and brown leather look blank journals
  • 8” each black and rusty red ribbon
  • Beacon QuickGrip™ Adhesive

Instructions:

  1. Follow the directions found in any of the Arnold Grummer™ paper making kits to create white slurry. 
  2. Cast one or more of the hands mold. Dry the casting.
  3. Add tan scrap to the slurry and create one or more of the hand castings.
  4. Dry the casting. (I always make extra castings to have on hand for future projects.)
  5. Use the Stylus handle and tip to lightly color the white hands casting with black/gray ink.
  6. Lightly color the tan casting with the rusty red ink.
  7. Clean & dry the tips.
  8. Open the journals and attach the ribbon to the inside of the spines with adhesive.
  9. Attach the hand casting to the front of the journal covers with QuickGrip™ adhesive.

Friday, October 23, 2015

The Gift of Autumn Leaves

©Michele Emerson-Roberts 2014


Fall is in the air! It is a perfect time for me to start on the many “Fall” projects I have planned to do. This piece is one of my favorites and will make a perfect gift for a dear friend who loves Fall as much as I do.


Supplies:

  • Any of the Arnold Grummer™ paper making kits
  • A sunny window
  • Blender, cello sponges and soft towels
  • Scraps of beige, tan, ivory paper (think junk mail, etc.)
  • Dried/pressed oak leaves on a stem (I used the AG flower press)
  • Tiny bit of dried spices (I used nutmeg)
  • SpellbindersTM Grand Calibur machine
  • Die: Quiet FireTM/Elizabeth Crafts Designs™  “Believe”
  • Scraps of Kraft colored heavy weight handmade paper or card stock for the die cut word
  • Beacon ZipDry™ Adhesive, double sided foam tape
  • Matt board

Instructions:

  1. Follow the directions found in any of the Arnold Grummer™ paper making kits to create light tan slurry.
  2. Create a sheet of paper, and while the paper is still a bit wet, lay the leaf stem onto the wet paper.
  3. Continue removing the water from the paper. Sprinkle the spice onto the damp paper.
  4. When the paper is dry mount it onto the matt board with ZipDry™ adhesive.
  5. Die cut “Believe”.
  6. Attach the word to the bottom left corner of the handmade paper with tiny pieces of foam tape.

The finished pierce can be framed in a shadowbox-style frame, or displayed on an easel.

Friday, October 2, 2015

EXPLORE

©Michele Emerson-Roberts  2015


As summer is winding down in many places, it is still warm here in Southern Arizona. I have had such fun with the wonderful paper casting molds from AG that I just had to make a new card for a friend who loves everything “fishy”. The castings are quick to create and it just takes a few extra minutes to make extras to use for later projects.

 
Supplies:

  • Any of the Arnold Grummer paper making kits
  • CP Nature’s Miniatures “Fish” (or mold of your choice)
  • Scraps of blue and white paper (think junk mail)
  • Blender, sponges & soft towels
  • Microwave, heat gun or sunny window
  • Scor-pal (LOVE the new 1/8” version)
  • Scissors
  • Die: CheeryLynn #B616 “Explore”
  • Spellbinders’ Grande Calibur II™ machine
  • Beacon QuickGrip™ and  ZipDry™ adhesive
  • Small eyed needle and variegated embroidery floss, one clear seed bead
  • Scrap of white handmade paper

Instructions:

  1. Follow the instructions found in any of the AG paper making kits or books to create one sheet of blue handmade paper (think card stock weight).  
  2. When the paper is dry, fold in half and tear to create two 5 ½ x 8 ½” pieces.
  3. Score and fold to create two 4 ¼ x 5 ½” cards. Set one card aside for a future project.
  4. Create white slurry and cast one of more fish.  
  5. When the fish casting is dry, use the brush to apply a coat of ZipDry™. adhesive to the inside back of the casting.
  6. When the adhesive is dry, use the needle to poke tiny holes in some or all of the “dots” on the fish.
  7. Working from the back of the fish, create tiny French knots in each of the holes. Attach the seed bead to the eye area with floss or adhesive.
  8. Die cut the word “Explore” from the scrap of white handmade paper.

Assemble the card:

  1. Attach the fish to the lower portion of the card with QuickGrip™.
  2. Attach the word with ZipDry™.
  3. Add a message inside the card. Enjoy!


Friday, September 25, 2015

Enjoy!

©Michele Emerson-Roberts  2015


I remember playing with “whirly gigs” as a child…… do you? They were fun and easy to obtain. It was such fun to run and run and watch the wind make them whirl. Wouldn't it be wonderful to be a kid again!

 
Supplies:

  • Any of the Arnold Grummer paper making kits
  • Scraps of pink  and white paper (think junk mail)
  • Blender, sponges & soft towels
  • Microwave, heat gun or sunny window
  • Scor-pal™ (LOVE the new 1/8” version)
  • Die: CheeryLynn # B413 “Enjoy”
  • Spellbinders’ Grand Calibur II™ die cutting machine
  • Westcott™ scissors
  • Two pieces 2” square of patterned paper
  • ColorBox™ light pink Chalk ink pad, Stylus™ handle & tip
  • Beacon QuickGrip™  and ZipDry™ adhesive
  • Scrap of white handmade paper
  • Pencil, 1/8” round hole punch
  • Two tiny white brads

Instruction:

  1. Follow the instructions found in any of the AG paper making kits or books to create one sheet of pink handmade paper (think card stock weight). 
  2. When the paper is dry, fold in half and tear to create two 5 ½ x 8 ½” pieces.
  3. Score and fold to create two 4 ¼ x 5 ½” cards. Set one card aside for a future project.
  4. Die cut the word “Enjoy” from the scrap of white handmade paper.
  5. Use the pencil to lightly mark on the diagonal all 4 corners.
  6. Cut on the lines leaving approx. ½” in the middle of the square.
  7. Fold each section toward the middle and adhere them with the ZipDry™ adhesive.
  8. Cut two thin strips of white for the handles.
  9. Use the 1/8” hole punch to place a hole in the center of the whirly gig and the end of the paper handle
  10. Assemble them with the tiny brad.
  11. Attach the two whirly gigs to the upper portion of the card with QuickGrip™.
  12. Attach the word to the lower portion of the card with ZipDry™.
  13. Add a message inside the card. Enjoy!